Parts Drawer Re-purposed
Okay so here it is, the pics of my first project with Milk Paint. It is a wooden drawer with many little compartments. I think it was used for keeping machine parts in or maybe letters and numbers for printing?
I found it at my local salvage store. My new favorite treasure trove.
Here it is before:
And after:
Thanks for checking it out. Let me know what you think of it. Be honest, I can take it. Well, not brutally honest though okay?
And for those who are interested, I made a quick tutorial. (Okay, not super quick, but quick for me at least.)
Let me just explain a little about milk paint first. I used "Miss Mustard Seed's Milk Paint" which I bought at this great store downtown Victoria "Sweet Peas AT HOME" (you can buy it on-line too I believe). The owner, Debbie was very helpful and had some great pieces of furniture that she had used the paint on. Very inspiring. The paint comes in powdered form that you have to add water to. It is not like latex paint or oil based paints in that you cannot control the outcome. Milk paint chips and flakes and gives a rustic time worn look. You never know when you apply it how much, or even if the paint will flake and chip. I believe the finish you apply it over has a lot to do with this but even then apparently it is not totally predictable. So I figured that since the drawer had a matte varnish on it that the milk paint would resist somewhat.
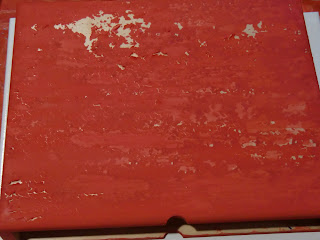
Here it is after the second coat. I mixed it a bit too thin I think, so the first coat was more like a stain. You can see where the second coat went over where it had already peeled off.
I wasn't expecting much else to happen at that point but well as you can see the second layer actually caused the paint to chip not only where it had the first time but also even more in the other areas as well.
So by the time it was done, it had chipped a lot more than I had expected. (and here I was worrying that it wouldn't chip at all!)
I used a paint scraper tool very gently to remove the flakes. You can also use it with a little more pressure to remove paint where it doesn't want to chip off.
The second coat ended up making it look more rustic than I had planned on, but well you just have to go with it. The drawer however didn't flake off much at all. But I did inadvertently help it along a bit. You see, I had painted the inside of the drawer black first and then taped it off and painted the red around the edges.
When I removed the tape, I also ended up removing some of the black paint as well. I was okay with this though as it seemed to go better with the drawer casing.
I then took some antiquing wax and applied this all over.
It deepened the color(which I liked) and helps to seal it and protect it from further flaking.
 |
Then I just put it together with the addition of some drawer stops to prevent it from falling out (I plan to hang it on the wall),some trinkets and scrabble letters in the compartments, and picture hanging hardware on the back.
It was a lot more work than I thought it would be(painting those compartments with two coats and a coat of wax took forever), but in the end I learned a lot about milk paint (both what to do and what not to do) and it was fun. I will definitely be doing this again. On a larger project next time. Probably with different colors and probably with very different results.
Ciao!


No comments:
Post a Comment